
The original Japanese version is available here.
As I mentioned in a previous article, I love driving and often go out on a whim. At this time, I felt like having some Sanuki udon ( Sanuki noodle ), so I drove to Kagawa Prefecture and had Kake udon and Tempura udon at two udon restaurants. This is a photo of the Tempura udon from the second restaurant. It’s a very simple udon with “Kakiage” served with the Kake udon, but the simplicity enhances the delicious taste of the udon. Oh, I’m getting hungry… I feel like going there again 🙂
Now, how do you manage passwords? If you’re using M$ Windows, I think the most commonly used method so far has been to use domain management with On-Premise Active Directory. Azure Domain Controller is also becoming quite popular. So what about UNX environments? The simplest configuration is server-based management using /etc/passwd, but there are issues. I think it’s almost impossible to update passwords as the number of servers increases. It may be possible to reset passwords for each server using /etc/passwd to set the password expiration date, but I hate password panics. I can’t remember all of them 🙁 It may be an option to keep using the same password forever, but once the password is known to others, there’s nothing you can do about it. This is not allowed in my company, and passwords need to be changed every two months. As I mentioned in a previous article, using NIS can alleviate the load to some extent, but there are also issues with this. While NIS can still be used normally in FreeBSD, if you look at the latest Linux, you’ll see that NIS is no longer supported by some distributions as a thing of the past. Leaving that aside, I would like to prepare account information in some way and try to manage passwords with Kerberos. Windows Active Directory can handle both user management and Kerberos, so it can be used as a KDC that can handle user management from UNX as well. In my company, SAMBA is a domain member and Windows user information can be used through PAM. Once users can be handled with PAM, user and password management can be easily done even for applications that do not support KRB5 or LDAP. Since I don’t have an M$ Windows Domain Controller in my experimental equipment, I will manage users and passwords in a UN*X-only environment and try to manage passwords with Kerberos.
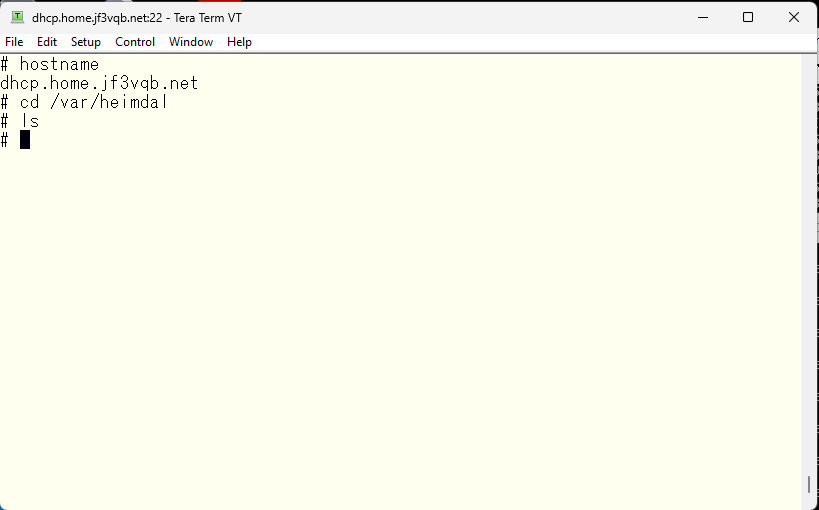
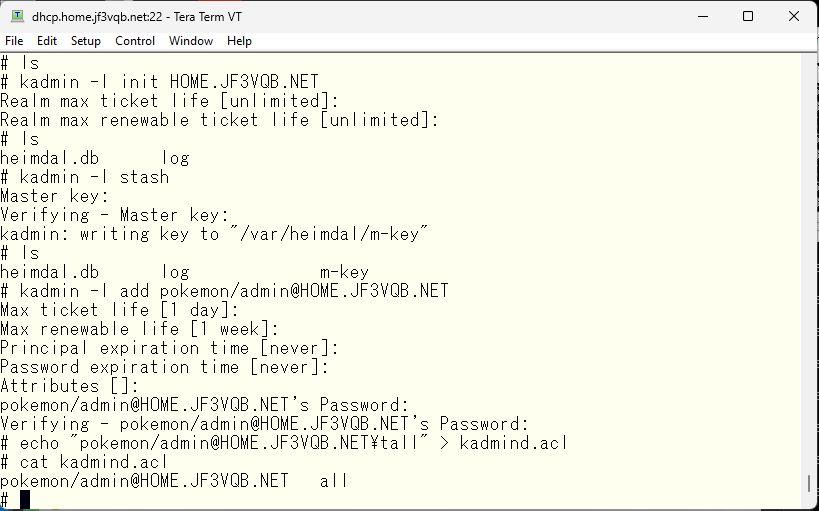
First, let’s design the KDC configuration. We’ll run the primary KDC with dhcp, and the secondary KDC with package. We’ll perform replication between the primary and secondary to prepare for primary failure. In Part 1, we’ll only set up the primary, and we’ll introduce the secondary and replication in Part 2. When reading about Kerberos, it is strongly recommended to prepare a dedicated machine for Kerberos. While I understand the recommendation, in an experimental environment, resources may be insufficient, so I’d like to proceed with a poor configuration as usual 🙂 When setting up the KDC, database and related files will be stored in the /var/heimdal directory. Since we haven’t done any configuration yet, let’s confirm that the directory is empty.
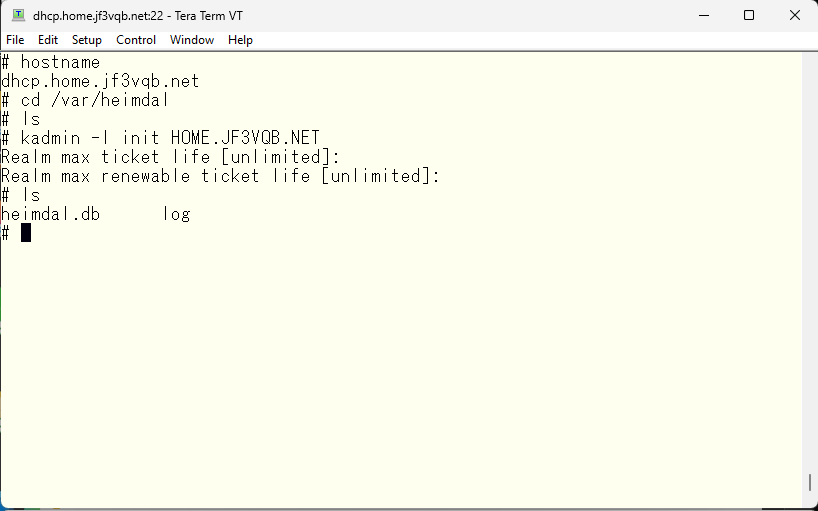
The first thing you need to do is initialize the database. Any realm is okay, so please read just as necessary. In my case, I used my usual HOME.JF3VQB.NET.
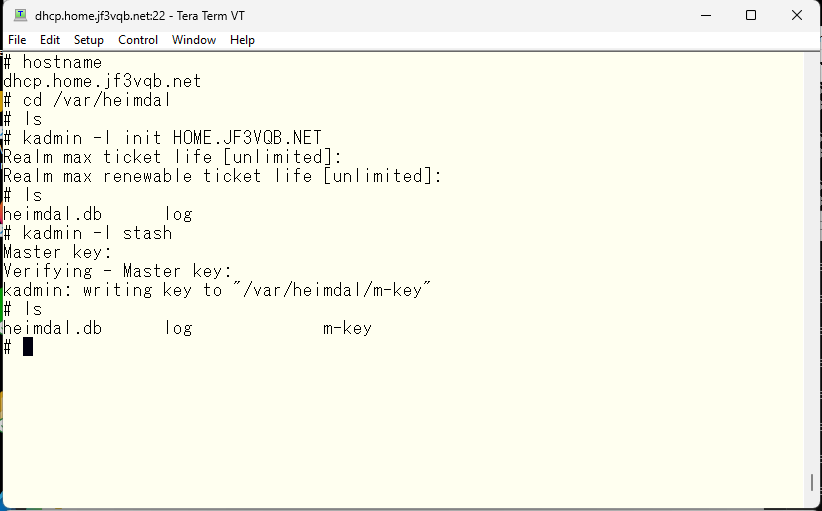
The next step is to create the master key. You should not type it manually, so use a sufficiently long, complex, and random password.
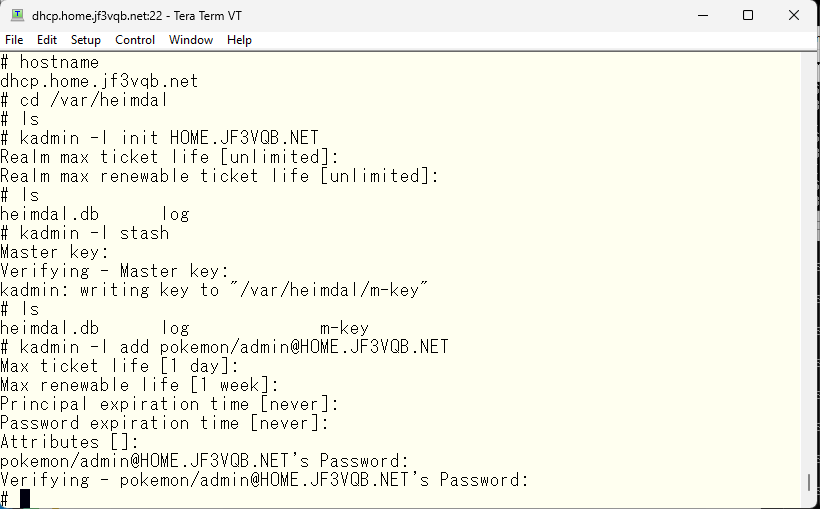
The next step is to create an administrator principal. You can create as many as you want, but each administrator will need their own principal. It’s not uncommon for multiple administrators to share one principal, but it’s not recommended for security reasons. You can use an easy-to-understand name like UID/admin or UID/root. Of course, any name is fine, but it’s important to make it easy to understand later on. So, I’ll use pokemon/admin for my example.
The reason why the principal created in the previous step can become an administrator principal is that it is designated to have the ability to do anything in access control, allowing it to be used as an administrator principal. Without this step, it is just a regular principal.
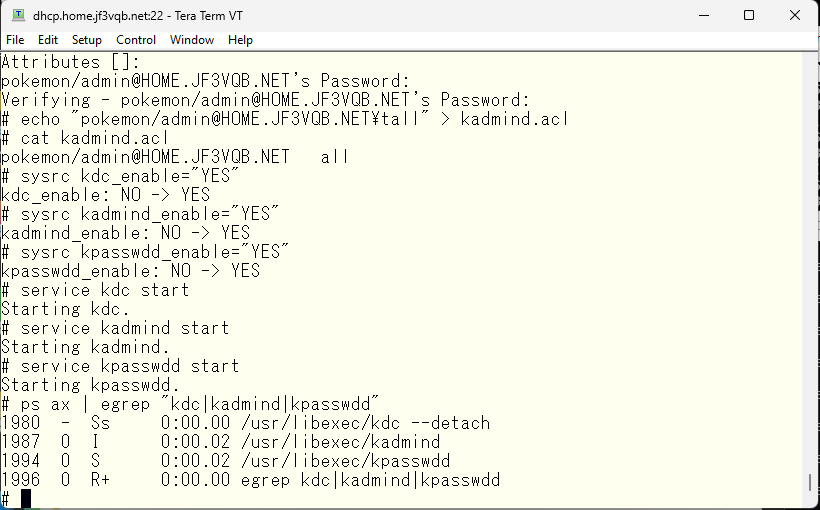
Now, with the preparations complete, let’s finish up! Start the various services by setting the appropriate variables in /etc/rc.conf and starting them with the service command. Alternatively, you can start the kdc service by running ‘/etc/rc.d/kdc start’ in /bin/sh.
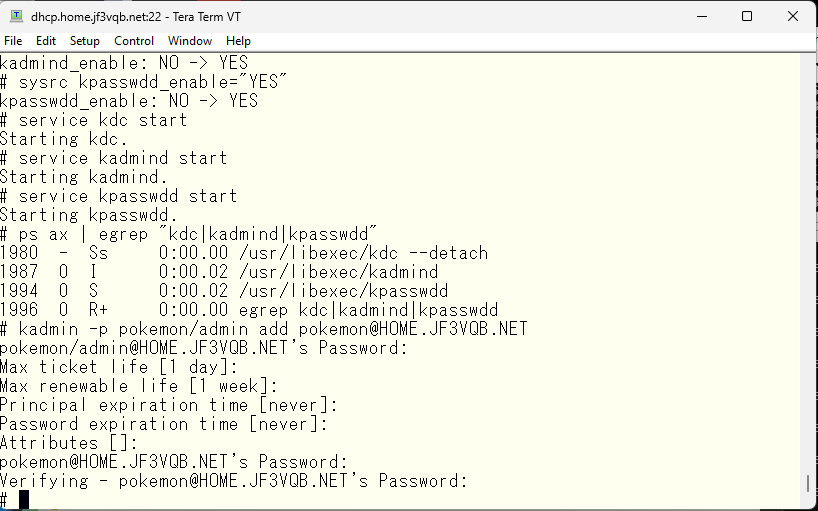
Using the administrator principal, create a personal principal.
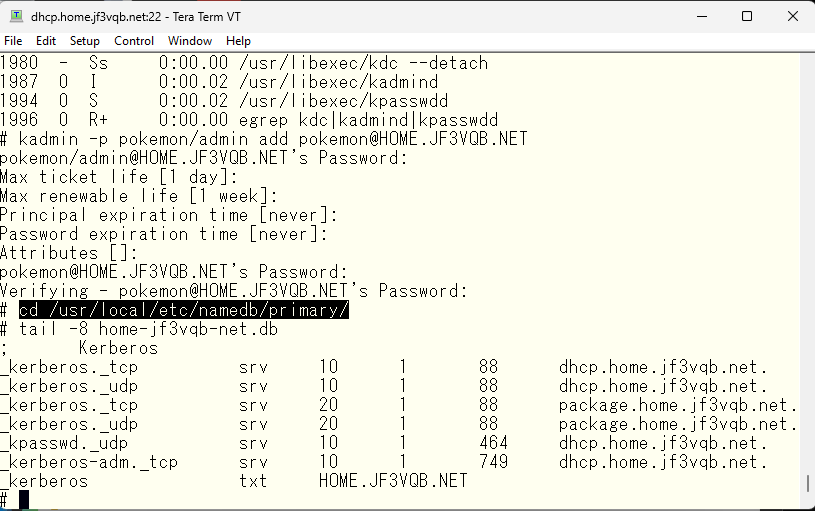
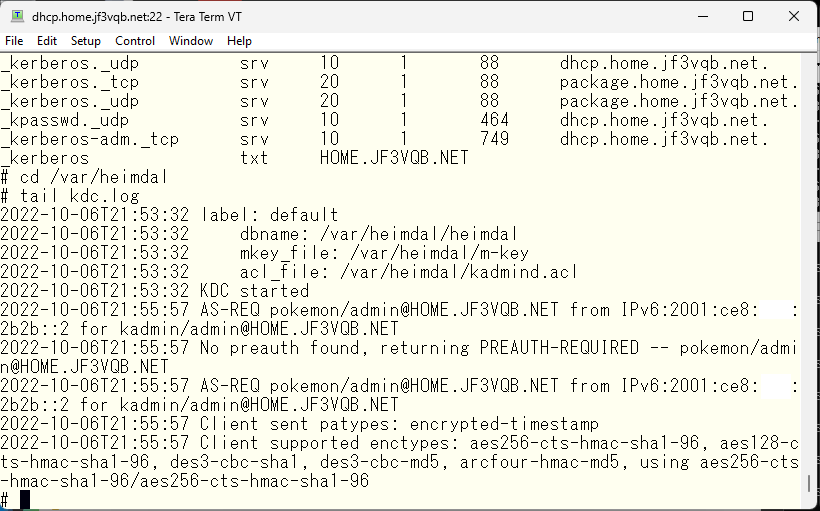
Now the KDC is ready and personal principals have been created. Here comes the problem. Other Kerberos clients do not know where the KDC is available. Even in the server dhcp, which set up the KDC on, does not know where the KDC can be used. There are two ways to provide this information to the clients: one is to write the necessary information in the /etc/krb5.conf file and distribute it to each client, and the other is to use DNS to specify where the KDC is available. Since we have set up a home DNS, I would like to use DNS to achieve this. I have shown the part related to Kerberos in the home.jf3vqb.net domain. The resource records familiar to DNS are A, AAAA, etc., but SRV and TXT records are used here. SRV is called a service record and can be used to specify where a service is available on the network. In the first line of this example, it means that Kerberos can be used on port 88 on dhcp.home.jf3vqb.net with TCP/IP. There are also lines with numbers like 10 or 20 in the same column, which are priority numbers, and the one with a smaller number has higher priority. So when using Kerberos with TCP/IP, you first try the port 88 on the server dhcp, and if that doesn’t work, you try the port 88 on the server package next. The last line, txt, is a text record, and each client can get the default realm of Kerberos. The resource with priority 20 will not be used until Part 2 as the KDC is not yet ready.
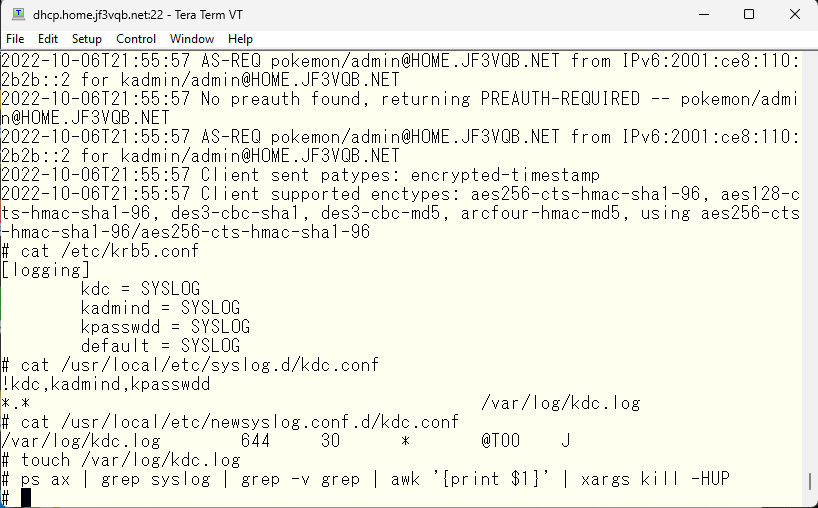
If you use DNS, you should be able to provide the information written in /etc/krb5.conf, so it shouldn’t be necessary. However, the second note in the handbook says that you need to write the minimum information, but there shouldn’t be any problem for normal clients even if this file is not present. So it should not be necessary, but it can be used to change behaviors such as how logs are taken besides specifying the location of the resources. The KDC creates a file called kdc.log in /var/heimdal and writes logs by default, but this is not very convenient, so I would like to make it output to syslog.
Write logging settings in /etc/krb5.conf, and specify how to log in the /usr/local/etc/syslog.d directory and how to handle old log files in the /usr/local/etc/newsyslog.conf.d directory. If everything is correct, send a HUP signal to the syslogd process. When it receives this signal, it will reread the settings. The textbook suggests using sh /etc/rc.d/syslogd reload to do this.
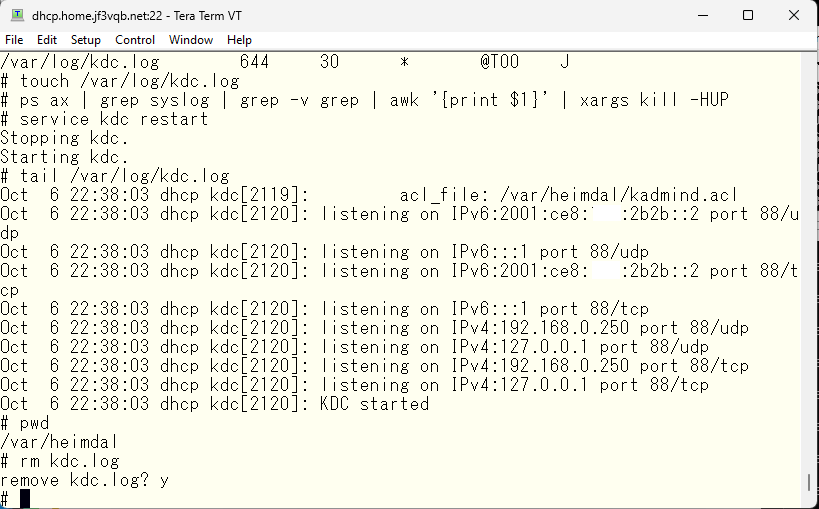
Now, restart the KDC. The file /var/heimdal/kdc.log is no longer used, so you can delete it.
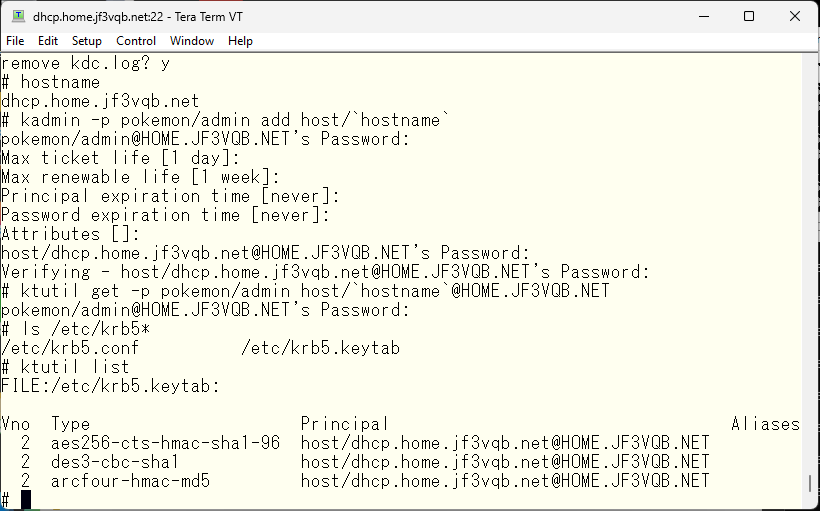
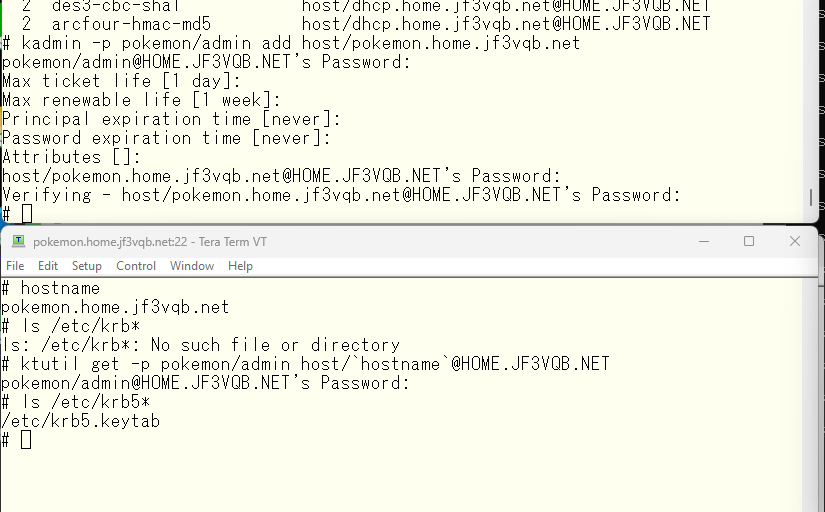
This completes the preparation for using the service. Create a host principal for the server dhcp and create the /etc/krb5.keytab file that contains the necessary keys for communication. The type of key depends on the application. For example, the key used for NFS is nfs/dhcp.home.jf3vqb.net@HOME.JF3VQB.NET. You can find this information in the description of each application’s use of Kerberos. Therefore, to use NFS with Kerberos, you also need an NFS key.
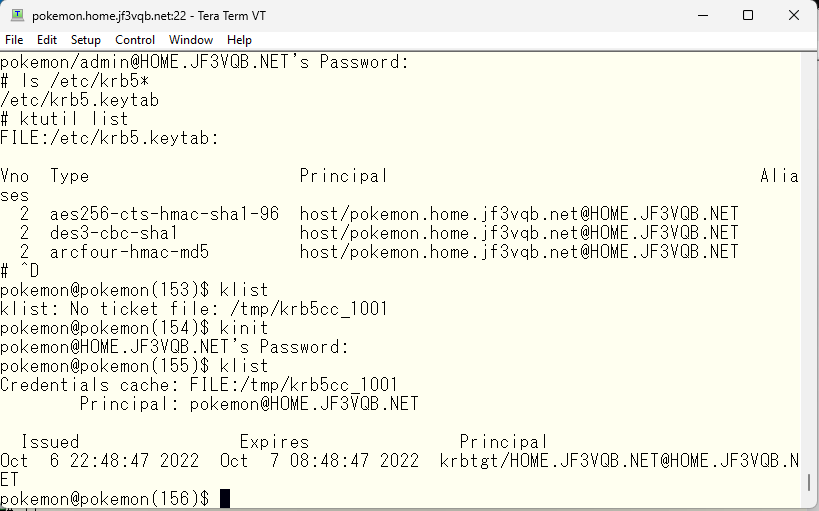
Let’s make Kerberos available on the server pokemon. Create a principal and obtain a key on the server pokemon based on that principal.
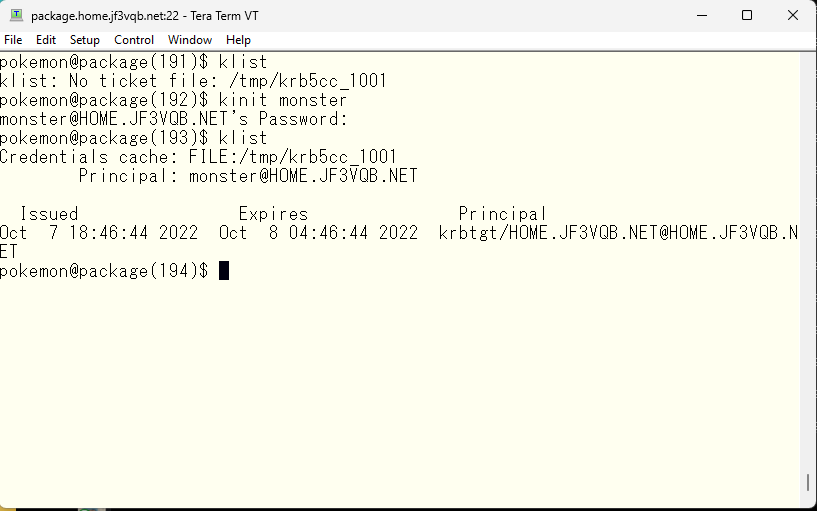
As an individual, I will obtain a ticket using the kinit command.
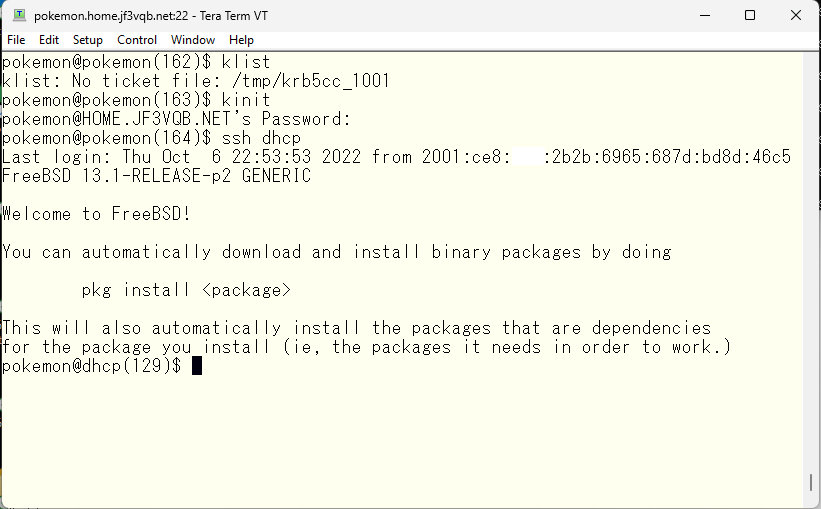
Confirm that SSH is now available for use with Kerberos.

Let’s SSH into the server dhcp. How about that? Looks good, doesn’t it? 🙂 No password was required.
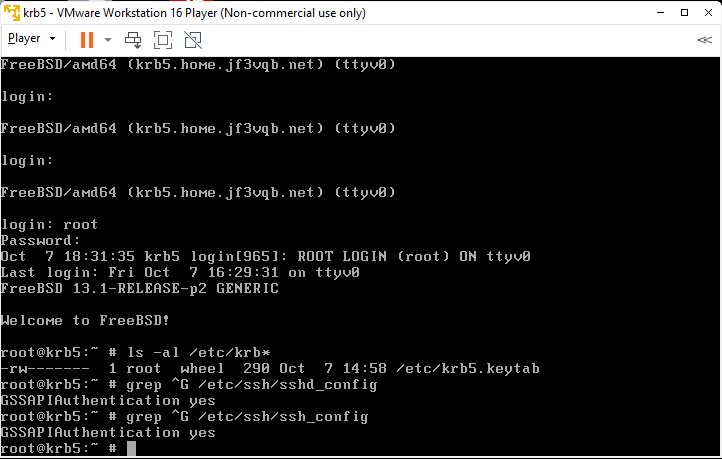
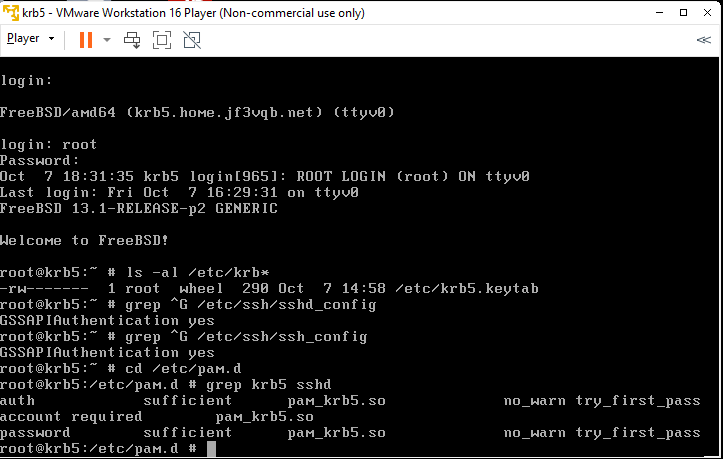
Let’s confirm the SSH with Kerberos on the new test server. It’s a plain FreeBSD with patches, vmware-tools, and pdksh installed. Following the steps taken on the server pokemon, we create a host principal with kadmin on the server dhcp, and create /etc/krb5.keytab with ktutil in krb5. Then, we configure SSH to use Kerberos.
Remove comments for pam_krb5 from all PAM files. Here’s an example for the sshd file.
Enable NIS in /etc/nsswitch.conf file and configure NIS client properly in /etc/rc.conf file. Since we don’t have any functionality to provide user information like Active Directory, we have no choice but to use NIS for now.

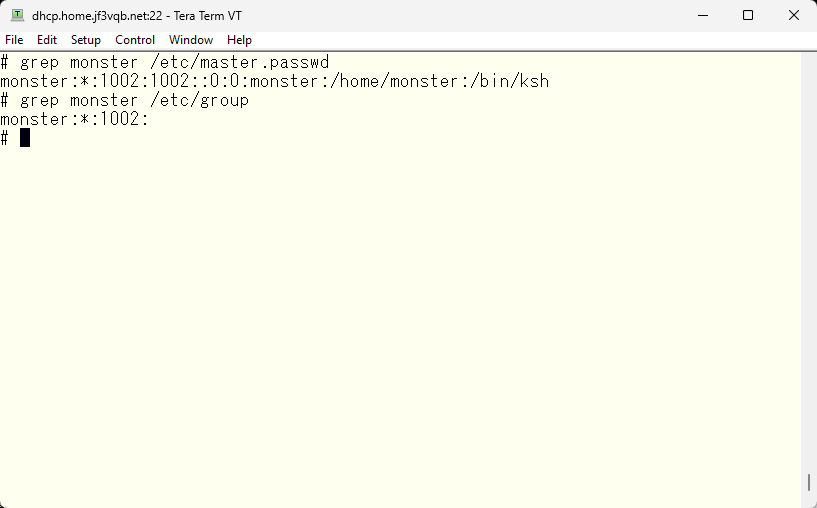
Create a user named ‘monster’ with a password of ‘*’ on the NIS master server dhcp. Typically, this account is in a disabled state.
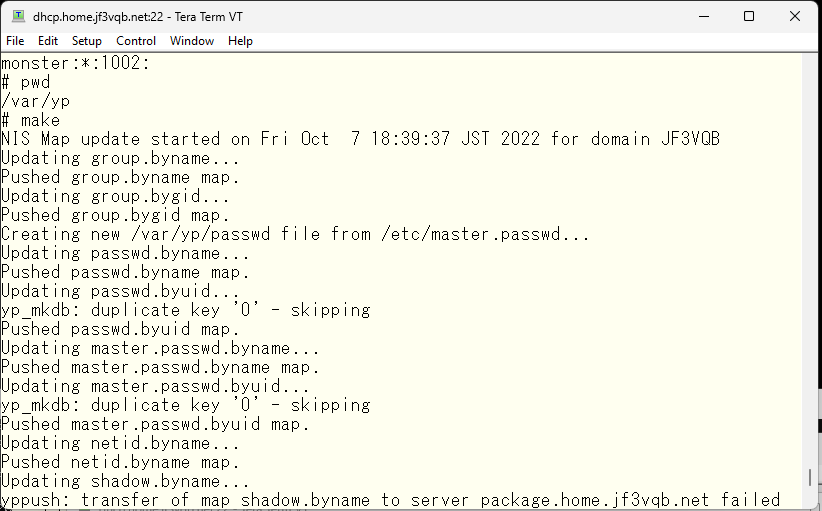
Push the information to the NIS server.
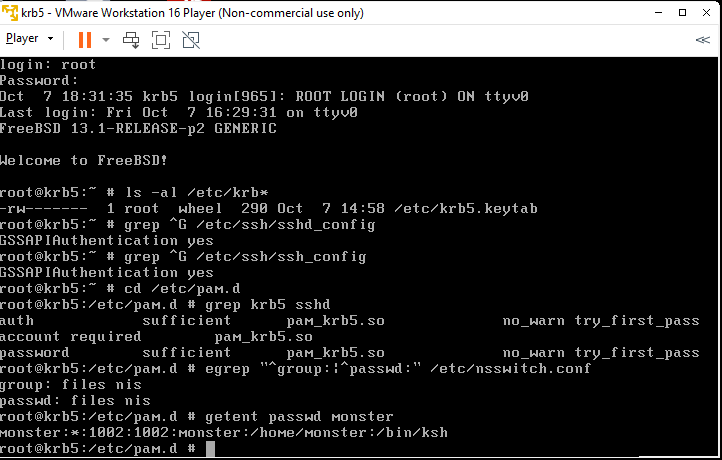
Confirm that the monster user is visible from the NIS client.
Use kinit to obtain a ticket for the monster user. Of course, being able to obtain a ticket means that the principal has been created beforehand.
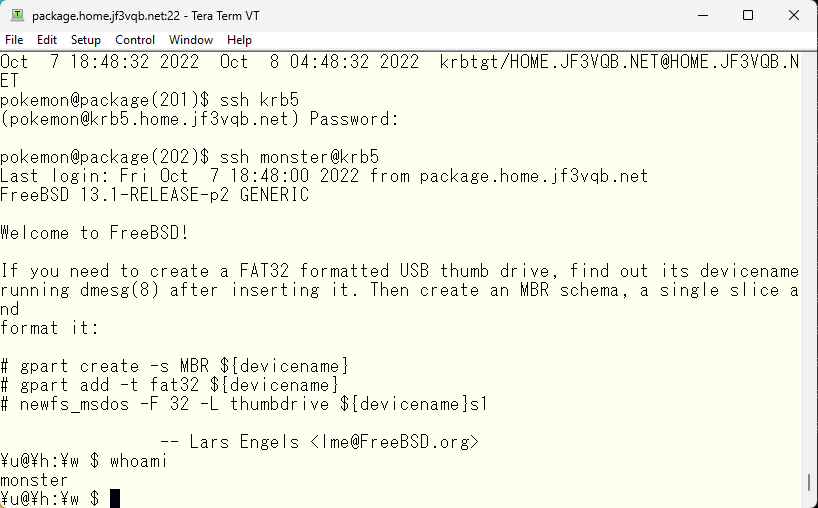
Let’s SSH into the server krb5. Oh, wait, we’ll SSH with user specified 🙂 Then, since the ticket is valid, we won’t be prompted for a password.
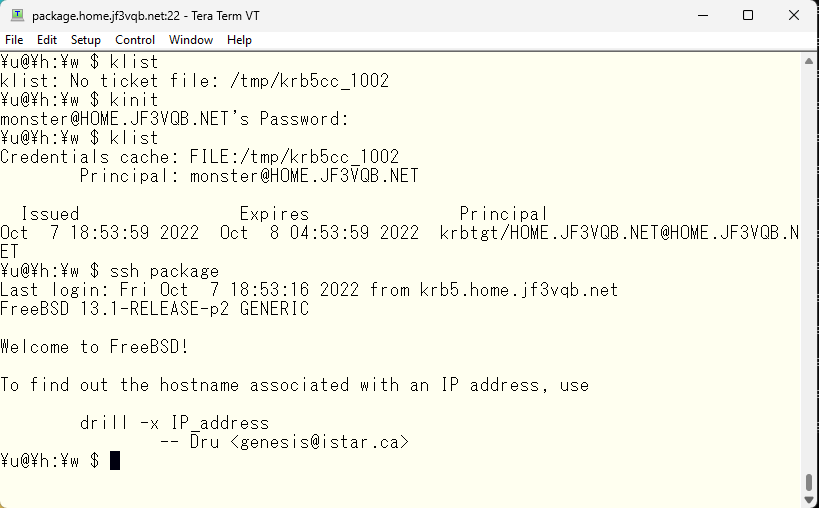
Next, let’s try sshing from the server krb5 to another server. Since we don’t have a valid ticket, we’ll run kinit first. Let’s try sshing to the server package. We didn’t need to enter a password.
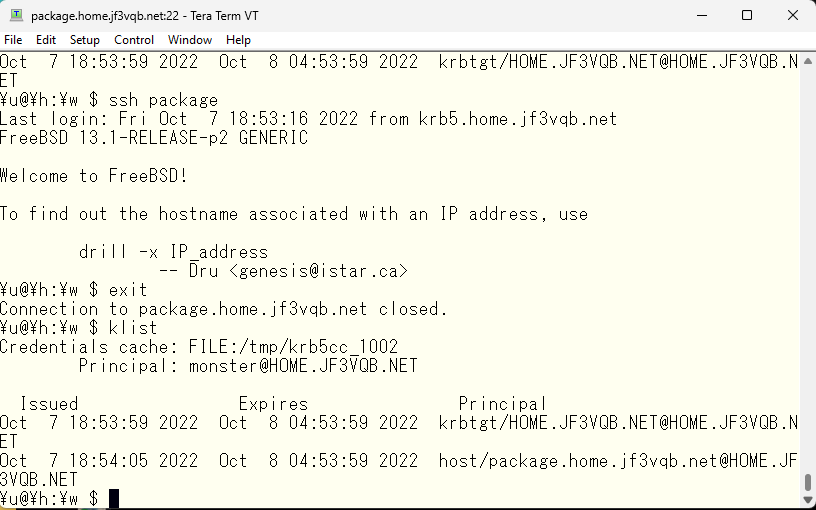
When logging out from the server package, it can be seen that the monster user on the server krb5 has a new ticket.
We have confirmed that a user with a disabled password can be created in NIS and its password can be managed by Kerberos. Once you obtain a ticket by entering a password with kinit, single sign-on is provided for a certain period of time. In the scenario we tested this time, we assumed that all user information for centralized management could be used on all machines, so we used NIS. However, in a scenario where only specific users use many servers, it may be possible to use /etc/passwd-based users and manage passwords with Kerberos without a centralized management system such as Active Directory. However, as the size of the organization grows, administrators may become very busy with user management.
This is a sea fishing park that extends into Takamatsu Port. The refreshing breeze was blowing, and it was the perfect place to relax before heading to the second Sanuki udon restaurant.

After finishing our second bowl of Tempura udon, we continued our drive. We took the Akashi Kaikyo Bridge via Awaji Island to get to Takamatsu, but for the return trip, we wanted to try the Seto Ohashi Bridge. As we drove along the coast, we noticed a sign for an observatory and decided to check it out. It was called the Goshikidai Observation Platform and seemed like a great location for good radio transmission at 2 meters or 430 MHz.

We took a break at a place called Noshō-misaki, enjoying the view of the Seto Ohashi Bridge. It seemed like the weather was about to take a turn for the worse, so we hurried back.

This is the rest area in Yoshima, as you may know. It was just at sunset, so I spent some time lost in thought.

Advertisement below